
This article straight forward guides to your most efficient recording setup at the start of your voice-over career.
In the beginning, the last thing you need is wasting time and resources on experiments. I’ve myself waisted probably 3 months going rabbit holes researching voice recording equipment and watching countless review videos. If I’d ever had someone directly told me here one, two, three is what you need to go and make money, I would gladly take that advice.
Now I am in the position when I can save your time and tell you straight forward those things.
| What you need to start making voice-over money | Cost |
| Recording Booth | $0 – $300 |
| Microphone Bundle with Mic Stand, Mic Cable, SMR Shock Mount, Pop Filter | Up to $300 |
| Audio Interface | $100 |
| Computer | $0 – $300 |
| Recording Software | $0 – $25 |
| Total | $400 – $1000 |
Given or take, you can expect 10-15% amounts fluctuation based on the season and items chosen. I am not going to dictate you what equipment to get, but I strongly encourage you to follow my advice if you want your dollars spent right and only once.
Yes, I’ve been trying to save money buying a cheap microphone bundle for $50. That allowed me to learn it hard way, that a miser pays twice. I am not just ended up burning more time in research on how to make a crappy microphone work. I’ve also ended up spending money again buying a new decent microphone.
You won’t make the same mistake if you follow my advice. For each position, I will provide reasoning on why it was chosen and not something else.
For those of you who are a little bit more curious and have some extra time to wander around instead of following the VO career path, there going to be in-depth articles on each subject.
Home Voice-Recording Booth
I haven’t paid a penny for mine. I was able to use my walk-in clothed full of clothing on hangers and on shelves.
One of the shelves serves as a holder for my tablet with a script. And it works perfectly fine. If I had a shallower closet with kind of bi-fold doors, I would’ve used the same way. Investing 0 dollars the clothes inside the closed and threw blankets over the side doors would give me enough soundproofing for a reliable startup booth.
Now, why is there is $300 cap for the recording booth in the table above? It is for those of you who have an empty room with nothing inside.
These dollars are meant to be spent on acoustic panels to treat the naked walls. You can use them to split the room, divide its space, so you don’t have to deal with a cave-like echoing. It’s done by using blankets hanging on background drop stands. By choice, you can craft a sound vocal audio booth for mic only.
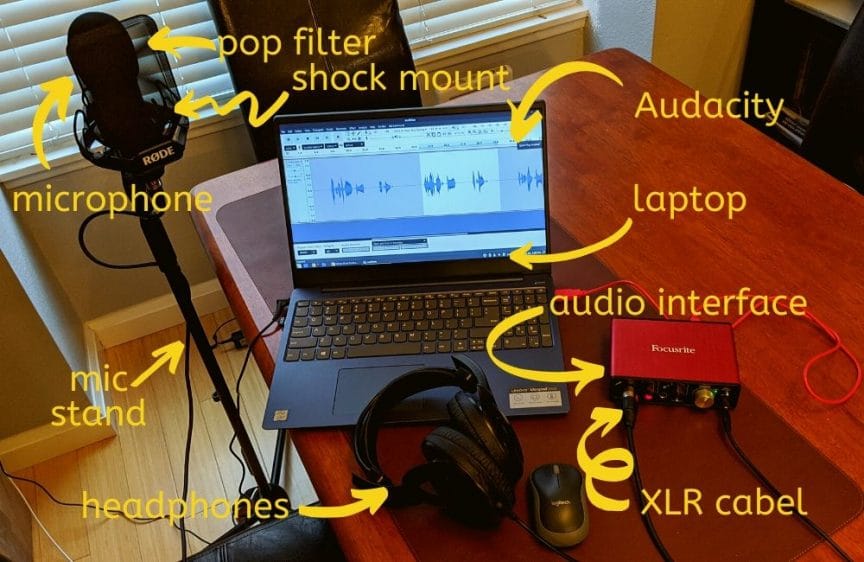
Microphone and Hardware
The most exciting part here is a microphone. I view my mic as a jewel of my recording setup, and everything around is a shell. Maybe it’s just me, but I really adore my Rode NT1. Yes, that’s the mic of choice.
I believe everyone who is serious about starting a voice-over as a side gig or career must begin with this microphone. I promise to explain my decision in another post. Microphone choice for beginners to a voice-over from home.
Here I just tell you that, this microphone is for sale for budget money but gives you the level of sound wast the majority of people indicate as professional. Oh, yes, and hardware a stand and mount and cable, all that included. You can have Rode NT1 microphone bundle with a mic stand, XLR cable, SMR shock mount, pop filter for less than $300
No matter if you ever spent any money investing in the tools. It is time to do it now, as without the right microphone no voice-over job can be done well. And if you are thinking of cheaper microphones, just remember my words from above.
Audio Interface and Fantom Power
These two are essential components if you want to have a professional home recording setup. If you noticed, the microphone is connected through XLR cable. And I doubt your computer will have an XLR port. That’s where the audio interface comes handy. Microphone XLR plugs into it and the interface is connected with a computer over a USB cable.
But that is not the only function of an audio interface. Besides connecting professional equipment with a computer, it improves the recorded signal before passing it to a computer. This offloads computer audio processing work. This significantly contributes to the quality and level of recorded sound.
When using a built-in or USB microphone, the only way to gain the recording level is through the software in your Operating system. Well, this can have limitations and may negatively affect your audio beyond a specific boundary.
Having a dedicated audio interface allows you to use professional tools and tune signal levels using hardware acceleration capabilities instead.
It also powers your microphone, allowing it to function. For the purpose of a home studio and one recording periphery device a.k.a microphone, you are good with a single interface device Scarlett Solo.
There is pretty much nothing to think about when picking an audio interface. The one recommended will meet your needs.
But if you want to go a little fancier, choose Focusrite Scarlett Solo 3rd generation version. It has a new cool feature called Air. When turned on, it gives you more amplified higher tones, which may become handy.
Computer or Laptop
That precious setup we assembled should be plugged into some computer to save recordings.
Generally speaking, any computer or laptop will work for your voice-overs. If you already have one, you need no worry about spending money on a new piece. Even an older laptop will serve your voice-over jobs.
The issue can arise from the location of your computer relatively to your mic. If it close to each other, then fan noise from a computer will be picked up by a microphone and ruin your work.
Luckily you can solve it easily. That XLR cable you received with Rode NT1 microphone is pretty long. 12 feets length is enough to extend mic and computer apart of so the fan sound is not interrupting your work.
The best would be to keep them in separate rooms. If you want to use the monitor for reading a script from it, you may need to find a longer video cable. That way, you can keep monitor inside the recording booth and a case in another room.
But what if you have a laptop and you don’t have a spare monitor to separate them. Consider digging into BIOS and tweaking fan settings. However, that’s is not a viable solution.
Perhaps, you can spend some dollars on a separate monitor with a longer video cable or on another computer or a laptop. I dedicated $300 in calculations, that should be plenty for a used piece.
Recording Software
Audacity is the way to go. It was my choice when we started voice-over with my son, and we never regret the decision.
Regardless of what OS you running MAC, Windows or Linux, they have versions for these platforms.
Audacity is open-source, free software. Yes, it is free to use. Still, I strongly encourage you to show your appreciation to the developers and donate the amount of your choice. Maybe after Audacity help, you make some dollars. You can use the amount suggested up above. Just don’t forget.
And yes, it is a professional software and that how it looks like. This software has so many features and extensions you will be amazed. And you barely use half of them in your day to day work. It literally has an overwhelming number of settings, and it easy to get lost in them.
You can search the Internet or deep dive into documentation of this app. But if you prefer to save time and learn exactly what you need to process recorded audio and make it up to quality standards, check out my article Audacity for voice over 101
Finally, you have a complete professional recording setup to work from home. No, it is not totally free to start making money in voice-overs. But the investments are super low if you follow my advice.
And you are definitely going to get back invested money very soon if you follow the blueprint I teach in my course